Your repeater system should come with the following items:
1) Signal Repeater / Signal Booster unit
2) Outdoor Antenna
3) Indoor Antenna
4) Low Loss Cable
Connection Diagram:
Installation Steps:
Note: Please keep the distance between outdoor antenna and Indoor antenna > 10m and at least 1 concreate wall separation in between them. If not the booster signal may oscillate and it may damage the booster.
Step 1
For Yagi antenna and Panel type outdoor antenna, the best place to mount is on the pole that mount the TV antenna, as it is usually the highest location available in a house and so the signal reception will be better. However, you could mount on other poles outdoor if it is available.
For Panel type outdoor antenna, except for mounting on a poles, it could be mounted on several other locations such as outdoor concrete / wooden beam structure or window railing. Please start by taking your mobile phone to find certain locations that you intend to mount the antenna , choose the location where the signal is strongest judging from the signal bar / signal strength displayed on your mobile phone. In order to measure the actual signal strength in dbm, please refer to the section “How To Check Signal Strength by Android Phone and iPhone”
Note: Never point the front of a directional antenna toward the inside antenna, ensure there are three feet of clearance in all direction surrounding the antenna.
Step 2
Temporarily mount the Outdoor antenna in that location. You may need to adjust and move the antenna later.
Step 3
Run antenna coaxial cable into the building to a location where you need to improve your signal coverage, please choose a location that you can also get the AC 110V~230V power for the Signal Repeater. Connect the outdoor antenna coaxial cable to the ‘IN’ port of the repeater unit. Then connect the power adapter to the repeater unit. Please make sure the signal booster is away from excessive heat, direct sunlight, moisture and has proper ventilation. Do not place the signal booster in an air-tight enclosure. ( If ventilation is not enough, please refer to section “How to Install Cooling Fan” ). When connecting the coaxial cable connector to the input port, please alight the center pin carefully to the port before tightening the connector to avoid bending of center pin, do not assert excessive force to tighten the connector as it may damage the wiring and connector.
Step 4
Place the Signal Repeater in that location and connect the coaxial cable from the outdoor antenna to the Signal Repeater.
Step 5
Connect your Indoor antenna to the ‘OUT’ port of repeater unit.
Step 6
Power up the system and check for signal inside the building. If needed, tune system by moving and or pointing the Outdoor and Indoor antennas until they get the most signal possible. Please note that for the Yagi type outdoor antenna, it need to point to base station for better signal performance. For Panel type outdoor antenna, the reception angle is wider as compare to Yagi type, but it need to point to the base station for better performance in general.
Step 7
Secure all antennas and cables, the signal repeater unit could be place on top of table or mount on concrete wall or any wooden structure, or on top of ceiling if indoor ceiling antenna are used. Using waterproof tape to wrap the connector in case some metal connector part are exposed to outdoor, this is to avoid oxidation caused by moisture and resulting in reduce of indoor signal coverage.
Repeater System Installation Guide (1 Antenna) :
(Indoor Whip Antenna – Come with SR-Series package)
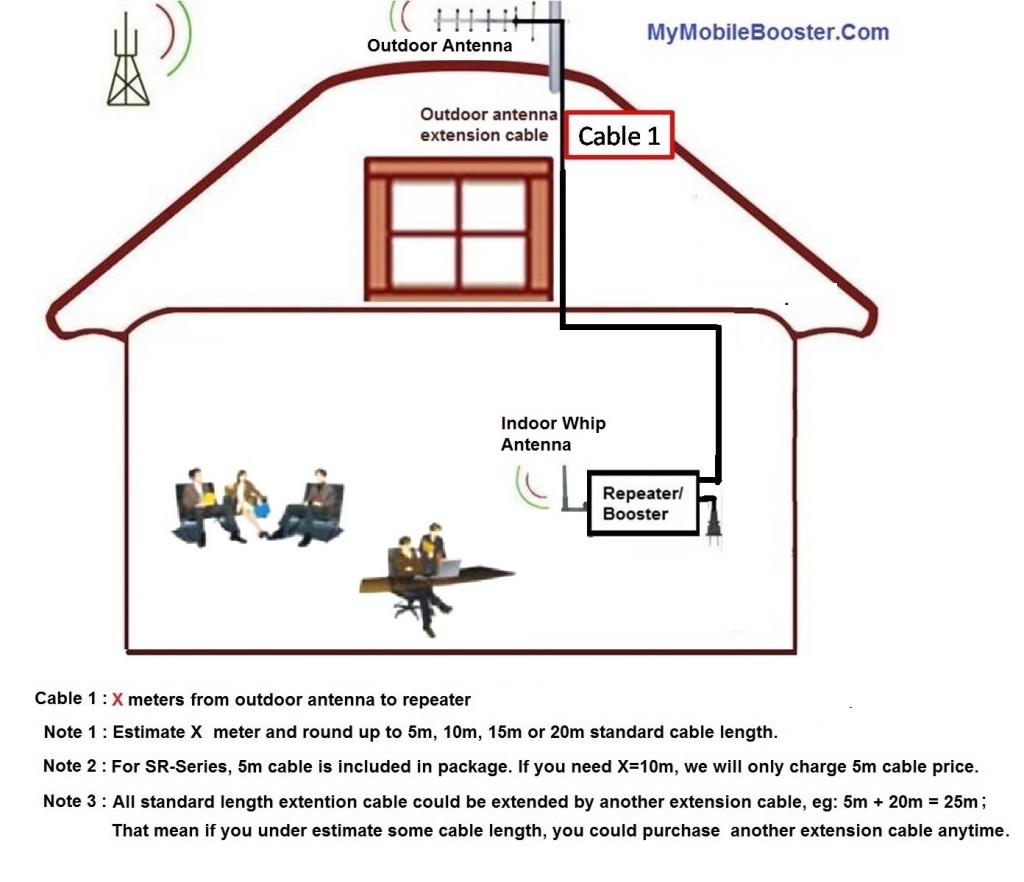
Picture above shows the typical installation of a repeater system with 1 indoor whip antenna (come with the SR-Series booster package), this is the simplest installation method as there is only one cable from the outdoor antenna to the booster unit, the indoor whip antenna just attach to the booster port. Please plan the wiring and purchase outdoor extension cables accordingly.
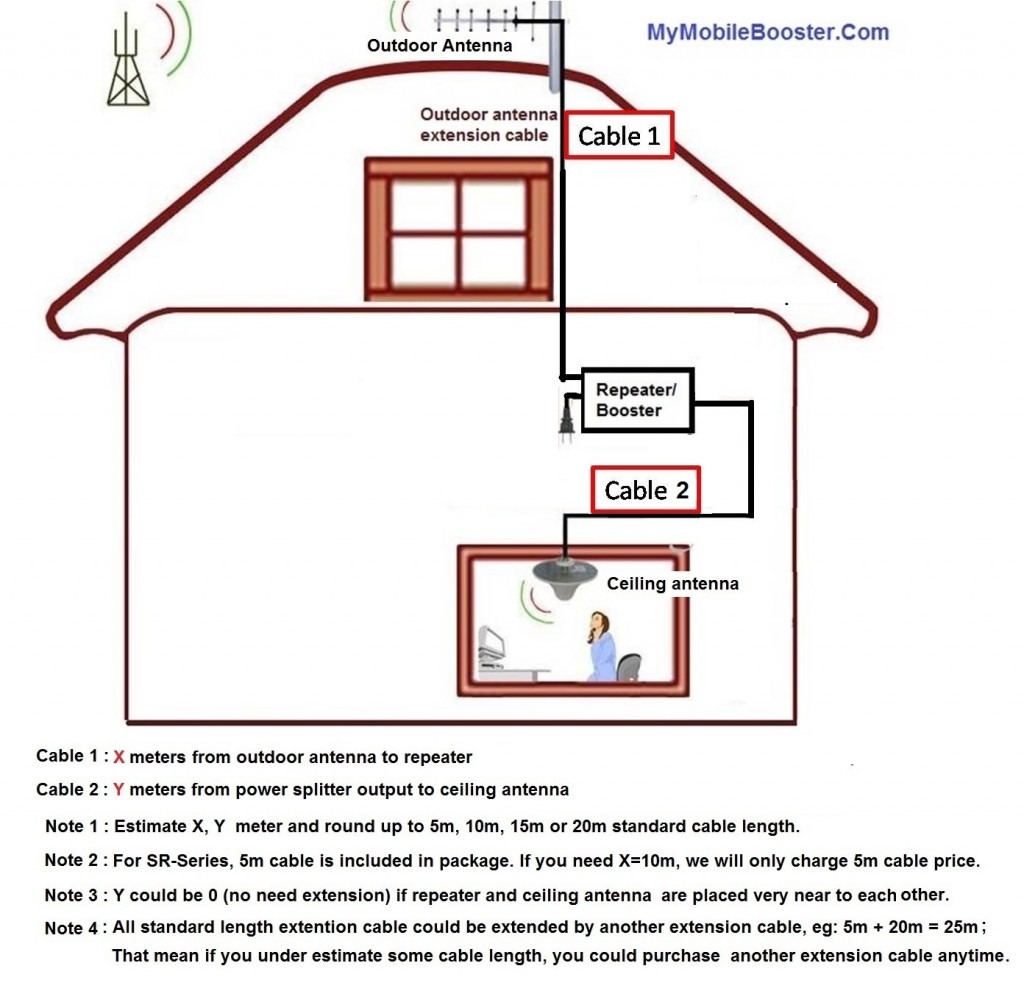
Picture above shows the typical installation of a repeater system with 1 indoor ceiling antenna, the installation is simple, just estimate cable length from the outdoor antenna to the booster unit, and the cable length from the booster unit to the indoor ceiling antenna. Please plan the wiring and purchase outdoor extension cables accordingly.
Repeater System Installation Guide (2 Antennas) :
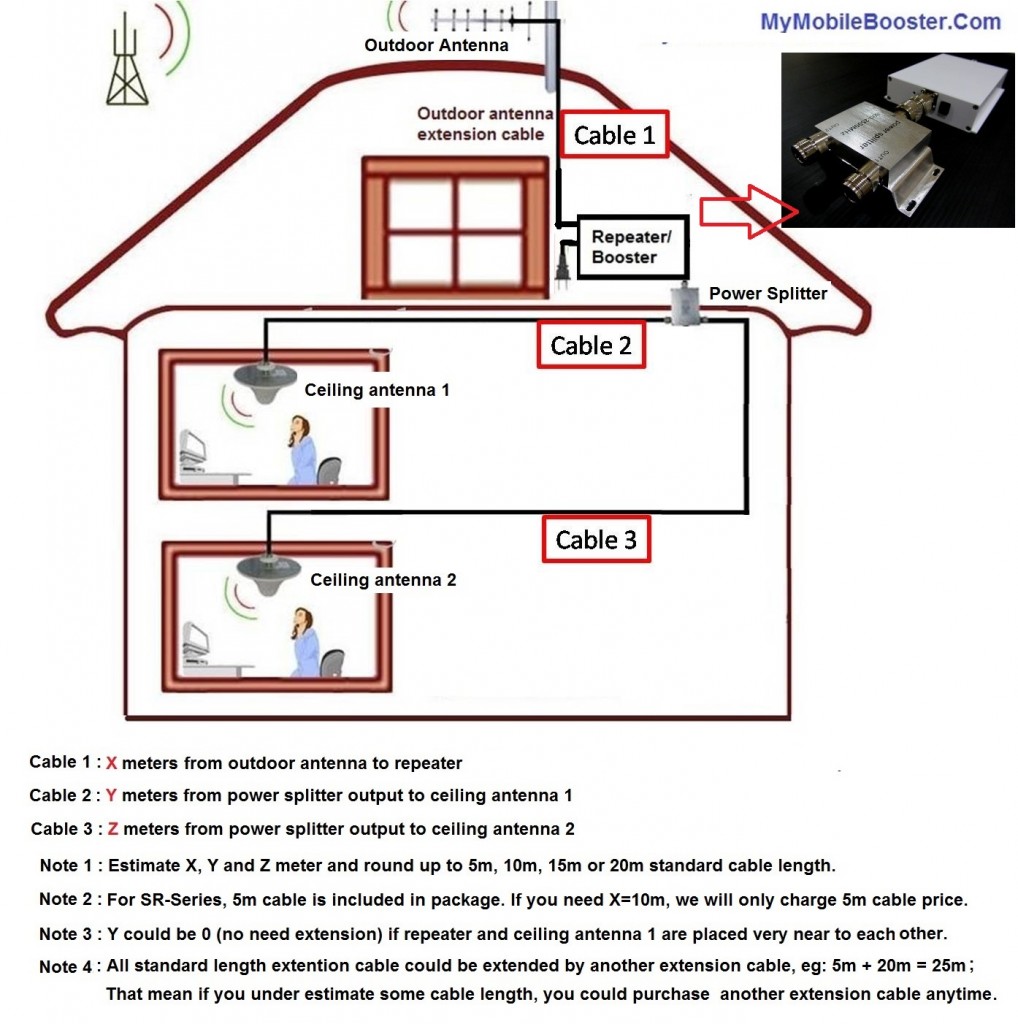
 Picture above shows a typical installation of a repeater system with 2 indoor ceiling antenna, connect the 2 ways power splitter as shown in the photo at the top right corner and lay the cable from the splitter output to the ceiling antenna respectively. Please plan the wiring and purchase the splitter and extension cables accordingly.
Mid Range (MR-Series)Repeater System Installation Guide (4 Antennas):
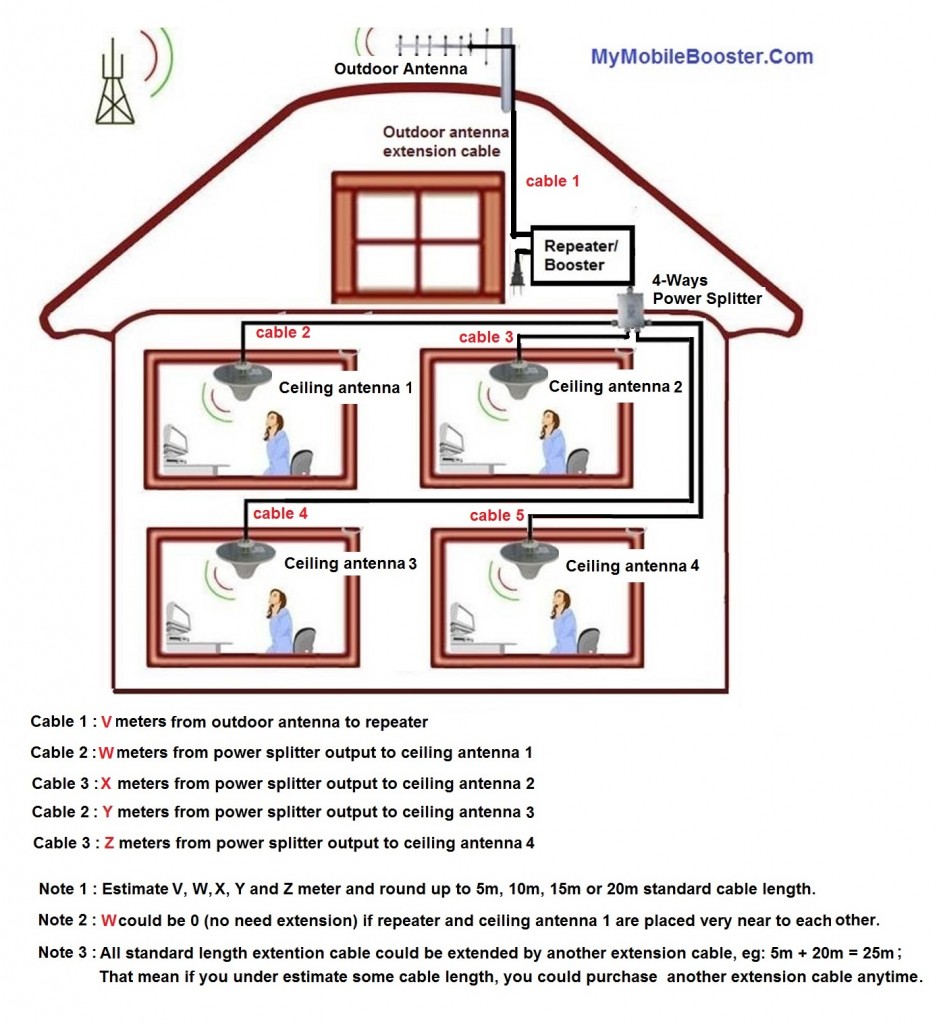
 The installation for mid range repeater system basically follow the 7 steps as describe above. Picture above shows a typical installation of a mid range repeater system for a two storey house, one 4 ways splitter and 4 ceiling antennas are used for the system. Please plan the wiring and purchase the splitter and extension cables accordingly. Please refer to the link: MR-Series booster or contact us for more information.
Long Range (LR-Series) Repeater System Installation Guide:
For LR-Series repeater, we will design Distributed Antenna System (DAS) for customer base on the floor plan with scale, with the DAS diagram, contractor can lay the cable and install the long range system accordingly. The cable used for long range system is higher grade and no standard length such as 5m, 10m etc, we will estimate the total cable length needed and contractor can make flexible cable length on the site. Please refer to the link: LR-Series booster or contact us for more information.
Outdoor Antenna Mounting Guide:
Please refer to the Outdoor Antenna Mounting Guide for more information on how to mount the outdoor antenna properly.
Troubleshooting Guide:
1) If the signal does not improve, please try to move the location of the outdoor antenna to get a better signal reception. Please keep some distance (>3m) between the outdoor antenna and the indoor antenna, preferably separate them with a wall in between, and do not install them in the same horizontal level, this is to prevent loop oscillation that will deter the signal amplification.
2) You must have a minimum amount of signal present outside where you would install the outdoor antenna. Failure to provide the repeater system sufficient signal will only result in a poorly performing system or will have absolutely no increase in reception inside the building. This is the number one consideration for a repeater system! A very weak outside signal will result in a smaller area covered inside.
3) The simplest way to mount the outdoor antenna is on the window railing, however, usually the signal reception here is weaker and tends to be nearer to the indoor antenna, please make sure there is enough distance to prevent loop oscillation as this will degrade the booster performance and reduce indoor coverage significantly. If you decide to mount the outdoor antenna on window railing, please keep re-adjust the outdoor antenna and indoor antenna unit until it give an acceptable performance for you. If it is impossible to increase the distance between outdoor antenna and indoor antenna, simply add an aluminium foil at the back of the outdoor antenna to isolate the transmission path between outdoor and indoor antennas, it could help to improve the loop oscillation issue.
Mounting Tips for Running Outside Antenna Cable
If you are mounting the outdoor antenna on the roof of your building, we have found that it is easiest to run your cable underneath the down side of your roof’s flashing . If you have satellite TV service installed at your home or office, you may be able to follow the same route as the satellite TV cables that are already running from outside of your building to the inside .
After routing the cable, we recommend sealing any areas where the cable passes into the building with silicone or other waterproof sealant to keep your installation from leaking . If you are mounting the outside antenna to the outside wall of your home or building, the simplest way is to run the cable on the outside of the wall and attach it to the exterior of your home or office . Then drill a hole through the wall where you want the cable to appear on the inside of the building . Before drilling, make sure that there are no electrical outlets, sewer or water pipes, or electrical wiring in the wall that you are about to drill through as this could potentially harm you or damage the building .
After drilling the required hole, run the cable through and seal it with cable bushings or a silicon-type sealant to enclose the hole that you have created . In some instances, it may be possible to run the cable up into the fascia of the attic overhang . In this circumstance, the cable will be accessible in the attic for further routing .
TIP1 – DO NOT WRAP THE CABLES
Do not wrap or coil the cables around anything.
TIP 2 – USE DRIP LOOPS
Use drip loops at the cabinet. This keeps moisture from collecting between the connection joints and in the cabinet itself. When using cabinets, bottom cable entry is recommended versus side entry. Never run the cable in through the top of your cabinet.
How To Check Signal Strength with Smart Phone
Android Phone:
Press Settings > About Phone > Network or Status depends on your phone.
Signal strength is usually measured in dBm. dBm is the power ratio in decibels of the radio power per one milliwatt. A signal of -60dBm is nearly perfect, and -112dBm is call-dropping bad. If you’re above about -87 dBm, Android will report a full 4 bars of signal.
If you want to check out just where you are at in raw numbers, you can check the status screen in Android’s menu. Just pull up the menu, scroll down and select About Phone, then select Status. On this screen you will be able to see your signal displayed in dBm as well as ASU. ASU is just a representation of the rate at which the phone is able to update its location by connecting to the towers near it. It basically measures the same thing as dBm, but on a more linear scale. You can convert ASU to dBm with this formula: dBm= -113+(2*ASU).
iPhone:
Step 1: Dial *3001#12345#* on your iPhone then press Call.
Step 2: You’ll now enter Field Test mode. You’ll notice a signal strength indicator on the upper left hand corner of your screen. You can toggle between signal strength bars and a number by simply taping on it. At this point, press the home button to exit the app or if you would like the feature to be permanent, continue on. Don’t worry, the process is completely reversible.
Step 3: Hold down on the Power button until you see the ‘slide to power off’ bar. Do not power off the device.
Step 4: Press down on the Home button until the app closes and you return to your home screen.
To return to the default bars permanently, follow these steps:
Step 1: Dial *3001#12345#* on your iPhone then press Call.
Step 2: Press on your Home Button once.
Blackberry:
For a BlackBerry smartphone that has a QWERTY keyboard, press and hold the Alt key and typenmll. To return to the bar graph, press and hold the Alt key and type nmll.
You could download the pdf version of Installation Manual here.
For more information regarding repeater installation, please contact us.


